
When ChunkHost, a hosting provider I’d been using since the mid-2010s, announced its closure last year, I missed the warning emails. This oversight could have spelled disaster but, on reflection, it was a serendipitous push towards reevaluating my hosting needs and expenses. This experience, while initially seeming like a setback, turned into an exploration of more sustainable and cost-effective hosting solutions.
Hosting, especially on dedicated servers or virtual machines, can be a significant overhead for anyone running websites or online projects. This is particularly true for smaller projects or personal sites, where the benefits must outweigh the ongoing costs. My situation was no different.This site is a passion project with no direct monetary gain.
Despite a hefty, grandfathered discount with ChunkHost, the monthly bills were a constant reminder of the burden associated with maintaining control over a online presence.
The closure of ChunkHost forced me to confront this overhead directly. It wasn’t just about finding a new “internet home” for my sites; it was about reassessing what I truly needed from a hosting provider. The loss of a familiar service was a catalyst for change, breaking down the energy barrier that often accompanies the search for new solutions. It’s easy to become complacent when things are running smoothly, even if they’re not running optimally. The disruption shook me out of this complacency.
In searching for alternatives, it became clear that traditional hosting models, particularly those involving dedicated virtual machines, were not aligned with my goals. They offered more power and flexibility than I needed, at a cost that was hard to justify for smaller projects. Even when factoring that multiple websites could be hosted on a single VM the admin overhead soon became problematic - and so bespoke script were a necessity. This realization led me to explore other options, eventually settling on Azure’s static web app deployment service.
Azure’s offering was a revelation in several ways. For starters, it caters to small projects with a free tier, effectively eliminating the cost barrier that deters many from starting new online ventures. Additionally, while it does provide a free, random domain for new apps, the option to use a custom domain remains - at no extra cost. This flexibility means that the only ongoing expense is the domain registration fee — a small price to pay for maintaining a personal or project-based online presence.
This transition to Azure has been more than just a change in hosting providers; it’s been a lesson in adaptability and the hidden opportunities that can arise from unexpected disruptions. What seemed like a loss — the closure of ChunkHost — became an opportunity to find a more sustainable and cost-effective solution for hosting my sites.
The broader lesson here extends beyond the specifics of web hosting. It’s a reminder that change, while often uncomfortable, can be a powerful catalyst for improvement. It forces us to reevaluate our needs and priorities, leading us to solutions we might never have considered otherwise. In this case, the disruption led me to a hosting solution that not only meets my current needs but does so in a more sustainable and cost-effective manner.
Below is a tutorial covering how to get started. This is not really to show you how you should run your deployment but more an example of a deployment. In this instance using GitHub and Hugo. Get funky though and let me know how you are rolling.
-
Install Hugo
-
Get a site https://gohugo.io/getting-started/quick-start/.
-
Get this into a new GitHub repository.
-
Sign up for a free Azure account
-
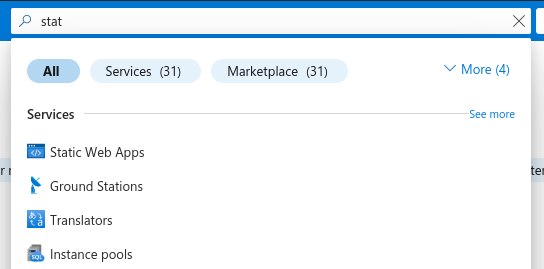
Search for “static web app”
- Click “Create”
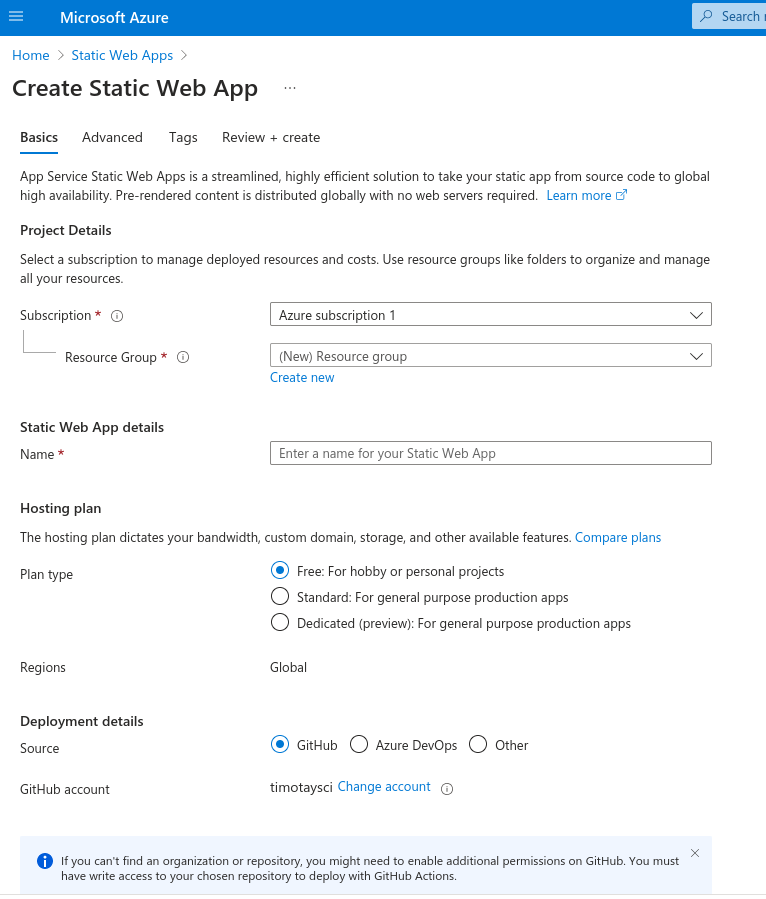
- Fill out the Basic tab. I would suggest creating a new Resource Group per site.
7.1 Select a unique name
7.2 Select “Free” plan type
7.3 You can choose deployment options but I would go for GitHub in this example
7.3.1 Select your Github organisation, repository and branch - You may need to authorize Azure Static Web Apps in GitHub. Browse to your GitHub profile and go to Settings > Applications > Authorized OAuth Apps, select Azure Static Web Apps, and then select Grant.
-
Click “Review + Create” then “Create”
-
Wait for the site to deploy - you will note that there are some new files added to your repo. - these allow for auto deployment of your site on push - more on GitHub actions here.
-
You are now done - Azure would have given you a temporary URL which can be found on the static web resource page. You can assign a custom URL to the site by clicking on the “Custom domains” blade. You will have to update your DNS records for you URL but that is beyond the scope here as that will differ on your domain provider so have a look for your specific set-up.
-
When you want to make a change, do so on your local copy of the repo and push to GitHub, GitHub actions will work in the background to deploy the site - this may take a few moments. You can check progress of this by checking the build status on the repo.